
Payment settings (optional)
Payment settings (optional)
Payment settings (optional)
If you use Stripe for payment processing, you can configure your PsychNow account to automatically collect a consultation fee before the patient begins the intake portion of the consultation.
If you are not using Stripe to collect a consultation fee, then you do not need to fill out the fields in the "Payment processing" tab in your settings. Patients will not be prompted to pay a fee at any time during the intake.
If Stripe is configured, the prospective patient is prompted to provide payment details at the start of the intake (NOTE: this is after you have reviewed their screening and clicked the “proceed to intake” button).
If you use Stripe for payment processing, you can configure your PsychNow account to automatically collect a consultation fee ahead of your first meeting. Stripe integration is not required to use Chapter.
If you are not using Stripe to collect a consultation fee, then you do not need to fill out fields on the Payments tab in your settings. Leave the default consultation fee set to $0. This will ensure that patients will not be prompted to pay a fee at any time during the intake.
If Stripe is configured, the prospective patient is prompted to provide payment details at the start of the intake (NOTE: this is after you have reviewed their screening and clicked the “proceed to intake” button).
Configuring Stripe
Configuring Stripe
Configuring Stripe
PsychNow supports the Stripe platform to collect your consultation fee. This document describes how to connect your Stripe account to your PsychNow account.
Using Stripe is not required to use PsychNow. If you do not use Stripe, you will simply need to collect your fee off-platform.
PsychNow supports the Stripe platform to collect your consultation fee. This document describes how to connect your Stripe account to your PsychNow account.
Using Stripe is not required to use PsychNow. If you do not use Stripe, you will simply need to collect your fee off-platform.
PsychNow supports the Stripe platform to collect your consultation fee. This document describes how to connect your Stripe account to your PsychNow account.
Using Stripe is not required to use PsychNow. If you do not use Stripe, you will simply need to collect your fee off-platform.
Fee Collection in the Consultation Process
Fee Collection in the Consultation Process
If you collect your fees on the PsychNow platform, they are collected before the patient begins the “intake” portion of the consultation. Here is a review of the full consultation process:
1) The patient submits a consultation request (the “screening”).
2) The provider reviews the screening and decides to either:
a. Close the consultation (with or without a referral).
b. Approve the patient to continue to the full intake.
3) If Stripe is configured, the patient pays the consultation fee.
4) The patient completes the intake.
5) The patient schedules the live meeting with the provider (off-platform).
6) The provider reviews the full intake to prepare for the live meeting.
7) The provider conducts the live meeting with the patient.
8) The provider writes the Assessment & Plan and completes the consultation.
9) (Optional) The provider writes and exports the Consultation Report (H&P).
To connect your Stripe account to your PsychNow account, follow these steps:
Step 1: Access PsychNow Payment processing settings
Step 1: Access PsychNow Payment processing settings
Access your account settings by clicking the “Settings” link on the lower left of your provider dashboard.
Click the “Payment processing” tab to open the payment settings.
Access your account settings by clicking the “Settings” link on the lower left of your provider dashboard.
Click the “Payment processing” tab to open the payment settings.
Access your account settings by clicking the “Settings” link on the lower left of your provider dashboard.
Click the “Payment processing” tab to open the payment settings.

If you are not using Stripe to collect payment, then you will leave these settings blank, and patients will not be prompted to pay at any time. In this case, you would collect the fee offline by whichever means you like.
If you are collecting your fee on the platform, you need to provide 2 “keys” in these settings:
• Stripe publishable key
• Stripe restricted key
Step 2: Generating Stripe Keys
Step 2: Generating Stripe Keys
The Publishable Key
The Publishable Key
To create a Stripe key, first go to https://dashboard.stripe.com/apikeys. You will see the Stripe “API Keys” dashboard.
To create a Stripe key, first go to https://dashboard.stripe.com/apikeys. You will see the Stripe “API Keys” dashboard.
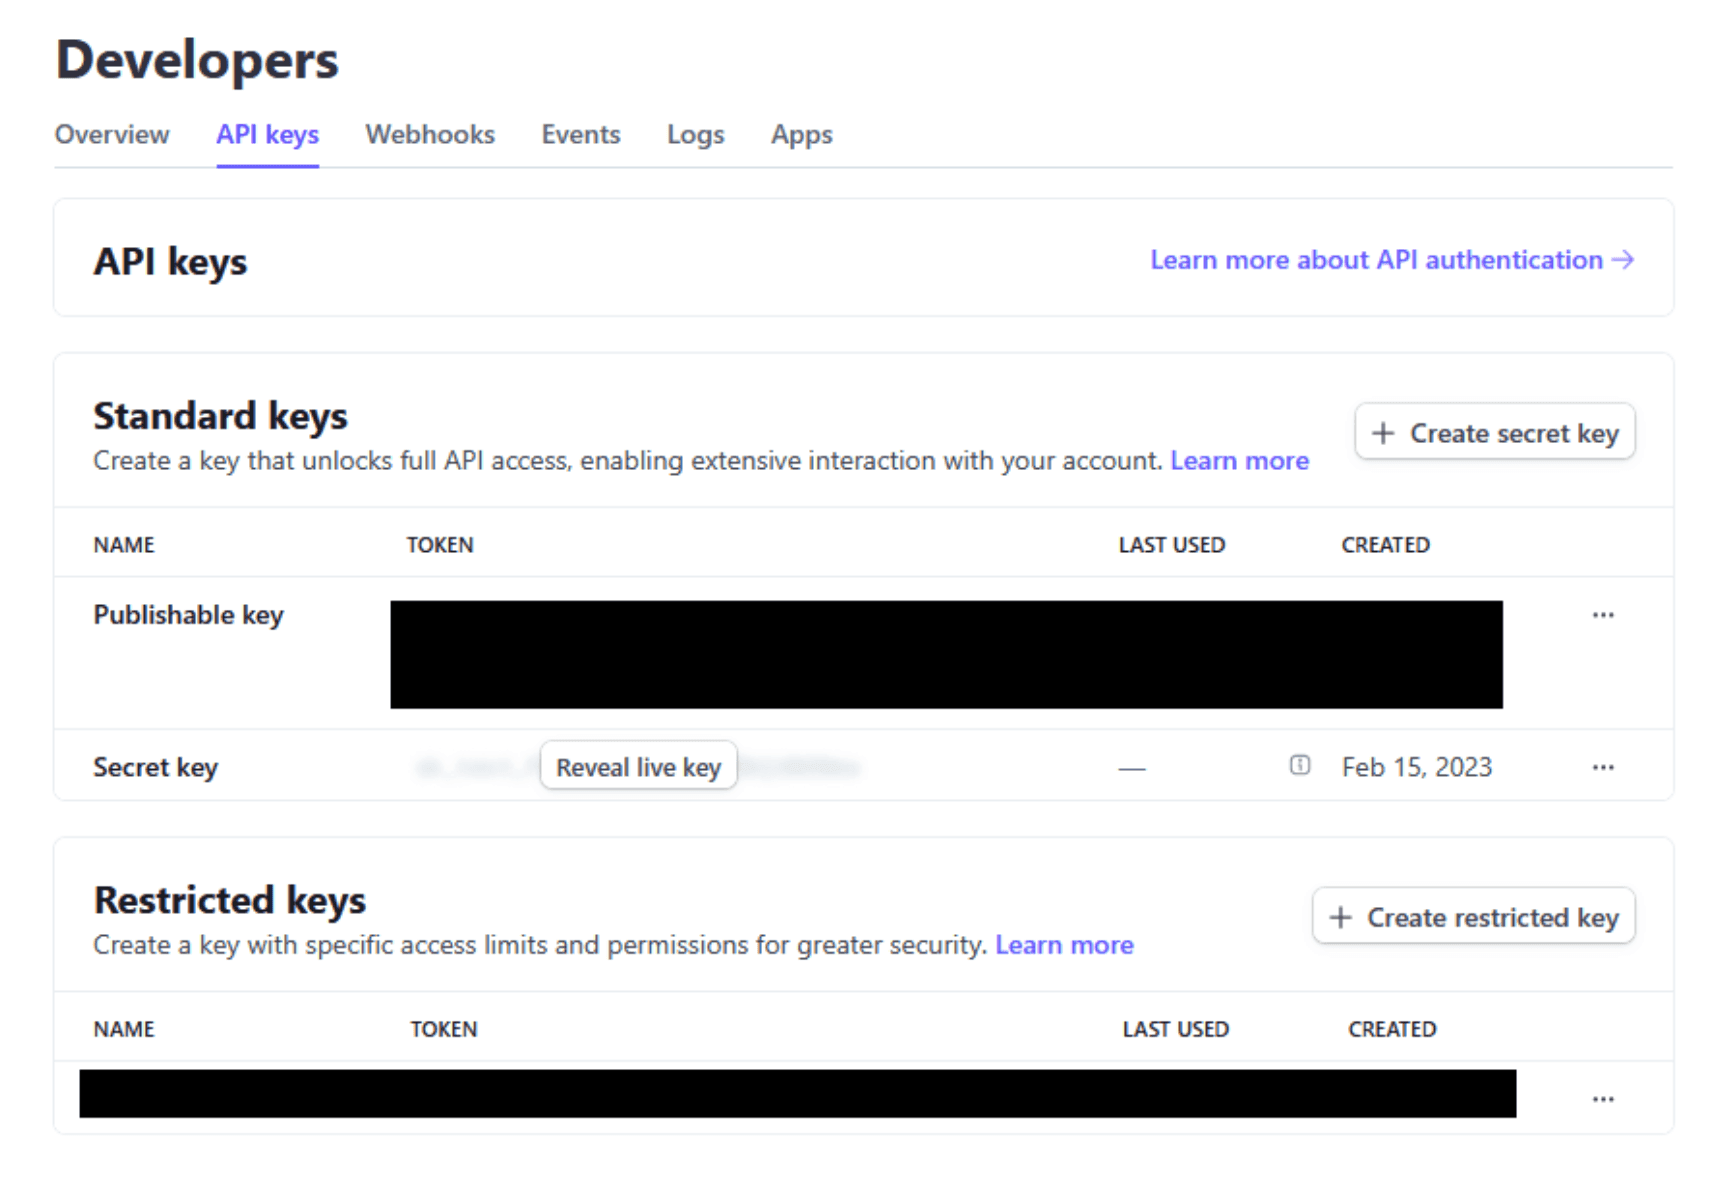
In the “Standard keys” section, you will see the “Publishable key”. This is the first key that PsychNow requires. You can copy this key by clicking on it and then paste it into your PsychNow account payment settings.
In the “Standard keys” section, you will see the “Publishable key”. This is the first key that PsychNow requires. You can copy this key by clicking on it and then paste it into your PsychNow account payment settings.
The Restricted Key
The Restricted Key
In the "Restricted keys" section, click the "Create restricted key" button. This will bring up an option to choose between two methods for key creation.
In the "Restricted keys" section, click the "Create restricted key" button. This will bring up an option to choose between two methods for key creation.

Select "Building your own integration" and click "Continue". This will open a page where you specify the permissions you will grant to the new restricted key.
Select "Building your own integration" and click "Continue". This will open a page where you specify the permissions you will grant to the new restricted key.

Give your key a name, it can be anything you want. Here we have chosen "PsychNow Integration".
Below the name is a large table where each possible permission is presented on a row. To the right of the permission type, there are 3 options:
• “None”
• “Read”
• “Write”
By default, all the permissions should be set to “None”, meaning the new key has no permissions granted. PsychNow requires 3 permissions in order to collect your consultation fee. For each one, you must find it in the table, and then select the necessary permission level.
The first 2 permissions are “Customers” and “Customer session”:
• “Customers”: Select “Write” permission
• “Customer session”: Select “Read” permission

The final permission is the “PaymentIntents”, which should be set to “Write”.
The final permission is the “PaymentIntents”, which should be set to “Write”.

After setting the 3 permissions, click the “Create key” button at the bottom of the page.
After setting the 3 permissions, click the “Create key” button at the bottom of the page.
Stripe will ask you to confirm this new key, either by email or by an authenticator app. If you don’t have access to the authenticator app, contact your IT professional who administers your Stripe account.
Stripe will ask you to confirm this new key, either by email or by an authenticator app. If you don’t have access to the authenticator app, contact your IT professional who administers your Stripe account.


Finally, you will be presented with your new restricted API key.
Finally, you will be presented with your new restricted API key.
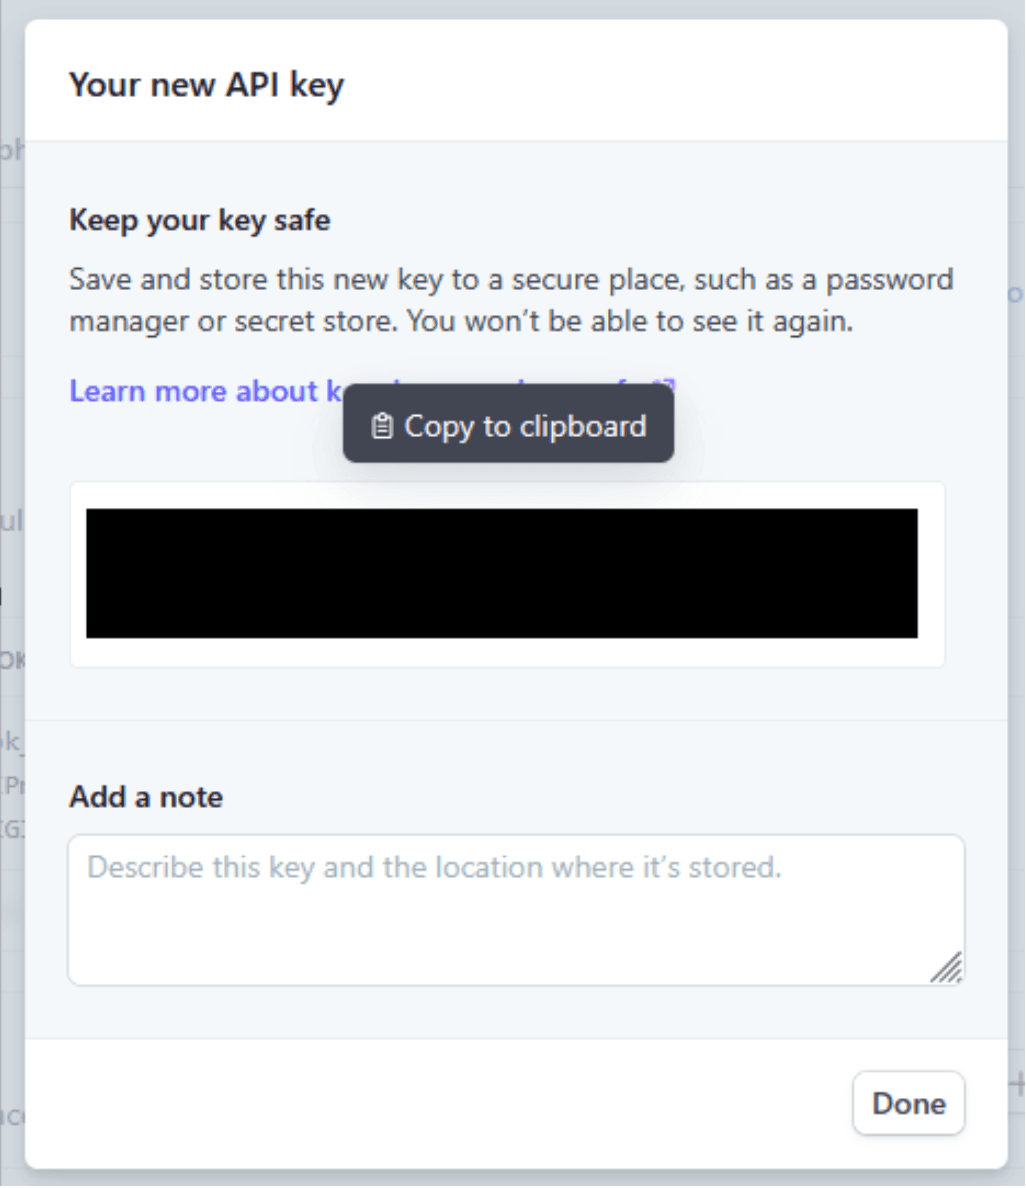
You must copy the key at this time. Once you close this dialog box, you will not be able to access the key again.
You must copy the key at this time. Once you close this dialog box, you will not be able to access the key again.
You can copy the key by clicking on it. Paste the new restricted key into the associated box on your PsychNow account payment settings.Once both keys are in place in your PsychNow account payment settings, click “Save Changes”.
You can then set non-zero default consultation fees on your patient invite links and begin collecting.

Bringing patient stories to light
Bringing patient stories to light
Bringing patient stories to light
Bringing patient stories to light